Installation of Xubuntu operating system
Summary
This guide covers the process of installing Xubuntu operating system in a new PC from a bootable USB flash drive. If you already have an installed Xubuntu then continue with network configuration and installing drag&bot application.
Prerequisites
- USB flash drive with at least 2 GB. This value may be bigger in the future for new Xubuntu releases. Therefore we recommend at least 4 GB.
- A working Windows or Xubuntu computer
- The target PC to install the operating system.
Create a boot drive
Through this tutorial you will create a bootable USB flash drive which can be used to install the Xubuntu operating system in any PC. You can create it from a Windows or from a Linux computer.
Warning
All files on the USB drive will be deleted during this process. Please remember to save all your important files from that USB drive to a safe location before starting the process.
 From Windows
- Download Etcher from https://etcher.io/.
- Download xubuntu-20.04.6-desktop-amd64.iso from here.
- Insert a USB flash drive with at least 2 GB in a free USB plug on the computer you are using to create the bootable drive.
- Start Etcher and follow the instructions. If you are asked if Etcher can get write-permissions on your system, give the permissions. Alternatively run Etcher as an administrator.
 From Xubuntu
- Open a terminal.
- Install the USB Creator application by executing the following command:
sudo apt update && sudo apt install usb-creator-gtk. If asked, please enter the current user password of the computer. - Start the USB Creator by running this command:
usb-creator-gtk. - Download xubuntu-20.04.6-desktop-amd64.iso from here.
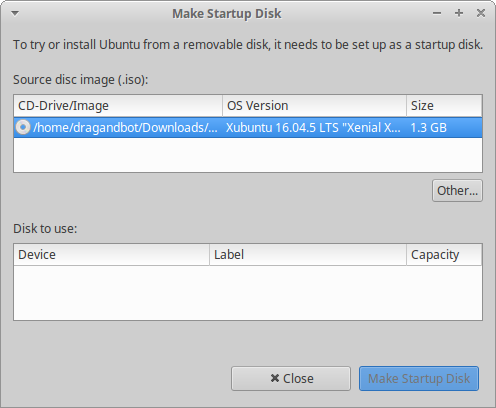
- Mount the ISO file in the USB Creator by clicking the button and selecting it from your download folder.
- Insert a USB flash drive with at least 2 GB in a free USB plug on the computer you are using to create the bootable drive.
- The USB drive name will appear on the Disk to use list. Please be sure you are selecting the correct one. Select it and click to start the bootable drive creation.
Xubuntu Installation
Prerequisites
- Bootable Xubuntu USB flash drive
- Computer configured to boot from USB drive http://www.boot-disk.com/boot_priority.htm
- Plug in the bootable USB drive into your PC and reboot it.
- On startup, you will see a Xubuntu log splash on the screen. The installer will perform some filesystem integrity checks. This can take a while.
- Afterwards the Graphical installer will pop up and present you with two options to
Try XubuntuorInstall Xubuntu. As a permanent installation is required to use drag&bot, select theInstall Xubuntuoption. - Next, choose your preferred keyboard layout and click
Continue. - In the next step, you are provided with the option of downloading updates and other third-party software packages for graphics, WiFi, and other media formats. Select to download updates while installing. Installing third party software is optional. An internet connection is required if any option is checked. Press
Continue. - The installer provides two or more options for Installing Xubuntu. The option
Erase disk and install Xubuntuwipes out your entire disk along with any files and programs. It also automatically partitions your disk and is recommended for those who are unfamiliar with the manual partitioning of a hard drive. For exclusively installing XUbuntu on a new PC, this option is fine. For other options take a look to more detailed tutorials, like this. - In the next step, specify your geographical location. If you are connected to the internet, the installer will automatically detect your region.
- Next, create a login user by filling in your user details such as your PC's name, username, and password and click on
Continue. Please set username and password to dragandbot. You may change the password later, if needed. This password will be asked for login and forsudocommands in the future. - The installer will begin by copying all the files required by Xubuntu. It will then install and configure all the software packages from the installation media. This can take a while.
- Once the installation is complete, click on the
Restart Nowbutton to restart the system. - Remove the bootable USB drive, when asked in the splash screen, and press ENTER.