Start drag&bot
Requirements
The network configuration is already done.
1. Start industrial PC
- Connect monitor, keyboard and mouse to the industrial PC.
- Turn on the industrial PC.
- When the welcome screen appears, plase login in your session with the provided credentials.
2. Start robot
- Power on the robot until it is ready to move.
-
Set up the robot and configure the robot network address. To learn how to setup the robot hardware network configuration you can continue with one of the following manuals:
Robot Setup Manuals  Robot Simulator Universal Robots Denso VS087 and Cobotta Meca500 KUKA IIWA KUKA KRC4 / KRC 5 RSI Interface KUKA KRC 5 TCP/IP Interface ABB IRC5 Yaskawa YRC1000 Epson Stäubli Nachi CFD
More will be announced...
3. Check network connections
- Check internet connection: open a browser and try to load a website e.g. www.google.com.
- Check robot network: open a terminal and enter the following command
ping <IP-address>with the IP-address of the robot, e.g. 192.168.0.42. If you are connected to the robot then you will receive answers. If you do not receive ping answers, please look here for more details: Robot Network Configuration
4. Start drag&bot
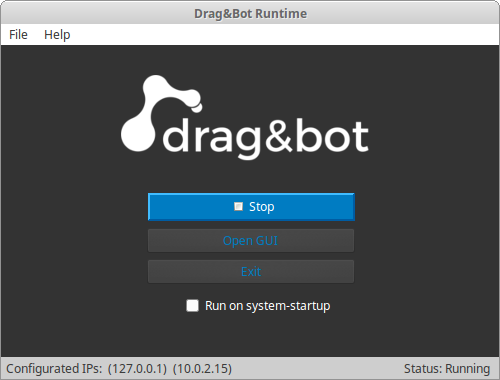
- Doubleclick the dnb runtime icon on the desktop. The drag&bot window should appear.
- Press "Start" to start the drag&bot Runtime.
- Press "Open GUI" to open a browser and load the login screen of
 drag&bot Studio
drag&bot Studio Configuration
Summary
- Create a connection between drag&bot Studio and the drag&bot Runtime.
- Add or modifiy active hardware and software components.
1. Create a Robot System connection
The first time you start drag&bot Studio you have to create a Robot System. The Robot System is a connection which leads to the network location of the installed drag&bot Runtime.
Tip
The drag&bot Runtime does not necessarily need to be on the same machine where you start the drag&bot Studio. We strongly recommend using both at the same machine for the beginning. This will lead to a less complex network setup in the first run.
Runtime on the same machine
- Create your first Robot System by clicking on Robot Systems in the Home page.
- Click on
 to create a new Robot System.
 - Enter a name of the Robot System e.g. Localsystem.
- Click on the Create button.
Note
Make sure port 9091 on the remote machine is open and try to ping the remote IP.
2. Compose Robot System Hardware
In order to select the hardware and software components and configure them, drag&bot provides the Component-Manager. The Component-Manger provides a list of robots and devices e.g. cameras and grippers. These can be selected and installed if necessary. Then, the installed components can be configured through the Component-Manager View.
Add a robot to the Robot System
- Go to the created Robot System by clicking on Robot Systems in the Home page.
- Click on the Edit
 Button next to the Robot System.
 - Click on Open Component Manager Button.
- Select the robot you want to add from the dropdown list.
- Click on Update & Install.
- Change the configuration parameter if needed, e.g. IP address of the robot.
- The status of the component should switch to Running.
Test the robot functionality
- In the navigation click on the
 Icon and open the Operators Panel.
 - By clicking on the arrows the robot should move in the indicated direction.
Note
The Operators Panel is a central controlling station of single components of a robot. Inside the Operators Panel it is possible to control the robot motion, close and open the gripper and set the digital IOs of a robot, between other functionalities.