Cognex smartcameras
Requirements
Make sure to also add the Vision Module component to your component setup. This is required to perform the calibration.
Requirements
Cognex In-Sight Explorer installed on a windows PC, this program is required to setup the camera and create its jobs.
Important
The Camera should be set into Online Mode using the In-Sight Explorer or the web interface before triggering the program using drag&bot. If the camera is set into Offline Mode manually using the the In-Sight Explorer or the web interface, the drag&bot program will not be able to change it to the Online Mode.
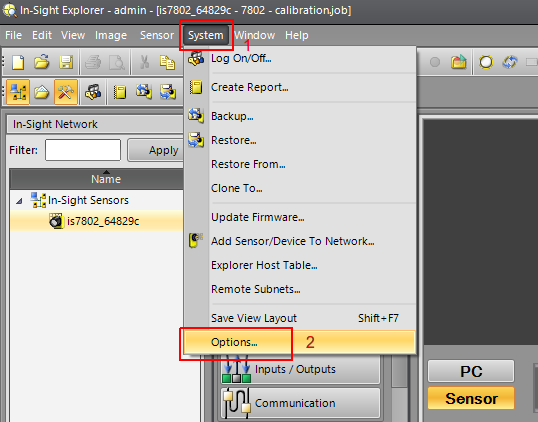
1. Cognex In-Sight Explorer
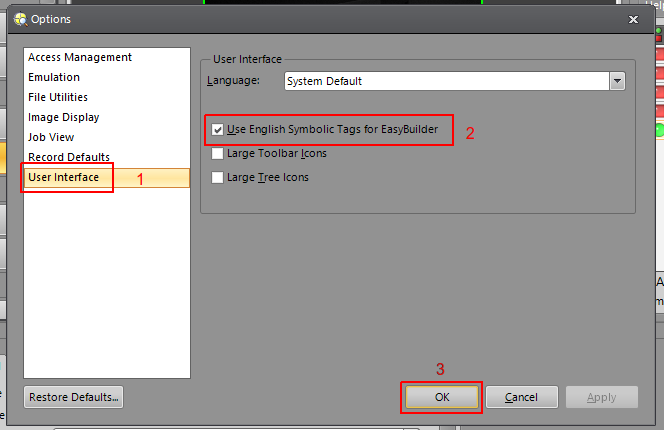
1.1. Language Setting
Important
Please follow the following steps in order to ensure the correct operation of the camera.
-
From the System menu select the Options.
-
Under the User Interface tab, activate the Use English Symbolic Tags for EasyBuilder option. drag&bot must work using English communication protocol.
1.2. Communication Interface Setup
The communication between the Cognex smartcamera and drag&bot is done via TCP/IP using Cognex native command, where the camera acts as a server and drag&bot is the client.
- Open the Cognex In-Sight Explorer and connect to the Camera.

- To access the camera settings, login as administrator (the default username is admin with no password). You will need to set the camera into "offline" mode in order to access some of the settings.
- Check the camera IP and Telnet port, which you will need to enter it later in drag&bot.
- Ensure that the camera web interface is activated in HTTP mode. Note down the HTTP port number.
1.3. Result message
After creating your localization tool, click on the Communication button to setup the tool result communication protocol. The result message type is string message with comma delimiter. The camera communication type is "Ethernet Native".
- Create your job.
- Go to Communication then click on Add Device , select Other and choose Ethernet Native then click OK.
- Click on Format String.
- Activate the Use Delimiter and ensure that Comma is selected.
- Add the message data as per section 1.2.1 or 1.2.2 or 1.2.3 below.
- To optimize the message size, it is strongly recommended to reduce the number of decimal places to three or fewer in float values. This can be achieved by individually selecting the relevant message fields and adjusting their decimal precision accordingly

Refer below video on how to setup the tool result message.
Note
- Ensure that the the selected communication type is "Ethernet Native".
- Ensure of using comma delimiter in the message format.
The message format should be as per below formats:
Note
- It is not possible to mix more than one type of objects in the same job (Example: The job contains 2D OR 3D Objects).
- Each localization tool should have a description.
- Names in tables below can be different from the actual.
1.3.1. 2-Dimensional Objects
For the 2-dimensional Objects, the message format should be as per table below. In case of more than one object, the below message format should be repeated for each object.
| Name | Data Type | description |
|---|---|---|
| toolName.Description | String | Object name |
| toolName.Pass | Integer | Detection success flag |
| toolName.Fixture.X | Float | Object x-coordinate in pixel or mm |
| toolName.Fixture.Y | Float | Object y-coordinate in pixel or mm |
| toolName.Fixture.Angle | Float | Object rotation around z-axis in degree |
| toolName.Fixture.Score | Float | Degree of match in % |
Example : Below is the message format for an job with two objects:
| Name | Data Type | description |
|---|---|---|
| tool-1.Description | String | Object-1 name |
| tool-1.Pass | Integer | Object-1 detection success flag |
| tool-1.Fixture.X | Float | Object-1 x-coordinate in pixel or mm |
| tool-1.Fixture.Y | Float | Object-1 y-coordinate in pixel or mm |
| tool-1.Fixture.Angle | Float | Object-1 rotation around z-axis in degree |
| tool-1.Fixture.Score | Float | Object-1 degree of match in % |
| tool-2.Description | String | Object-2 name |
| tool-2.Pass | Integer | Object-2 detection success flag |
| tool-2.Fixture.X | Float | Object-2 x-coordinate in pixel or mm |
| tool-2.Fixture.Y | Float | Object-2 y-coordinate in pixel or mm |
| tool-2.Fixture.Angle | Float | Object-2 rotation around z-axis in degree |
| tool-2.Fixture.Score | Float | Object-2 degree of match in % |
1.3.2. 3-Dimensional Objects
For the 3-Dimensional Objects, the message format should be as per table below. In case of more than one object, the below message format should be repeated for each object (Refer to the example in section 1.2.1).
| Name | Data Type | description |
|---|---|---|
| toolName.Description | String | Object name |
| toolName.Pass | Integer | Detection success flag |
| toolName.Fixture.X | Float | Object x-coordinate in pixel or mm |
| toolName.Fixture.Y | Float | Object y-coordinate in pixel or mm |
| toolName.Fixture.Z | Float | Object z-coordinate in pixel or mm |
| toolName.Fixture.RX | Float | Object rotation around x-axis in degree |
| toolName.Fixture.RY | Float | Object rotation around y-axis in degree |
| toolName.Fixture.RZ | Float | Object rotation around z-axis in degree |
| toolName.Fixture.Score | Float | Degree of match in % |
1.3.3. Text/QR-Code
For the Text/QR-Code, the message format should be as per table below. In case of more than one Text/QR-Code, the below message format should be repeated for each Text/QR-Code (Refer to the example in section 1.2.1).
| Name | Data Type | description |
|---|---|---|
| toolName.Description | String | text/QR-code name |
| toolName.Pass | Integer | Detection success flag |
| toolName.Fixture.X | Float | text/QR-code x-coordinate in pixel or mm |
| toolName.Fixture.Y | Float | text/QR-code y-coordinate in pixel or mm |
| toolName.Fixture.Angle | Float | text/QR-code rotation around z-axis in degree |
| toolName.Fixture.Score | Float | Degree of match in % |
| toolName.Text | String | Detected text/QR-code |
1.4. Example Program
Refer to the video below on how to create a simple job and configure the camera using the In-Sight Explorer.
2. drag&bot
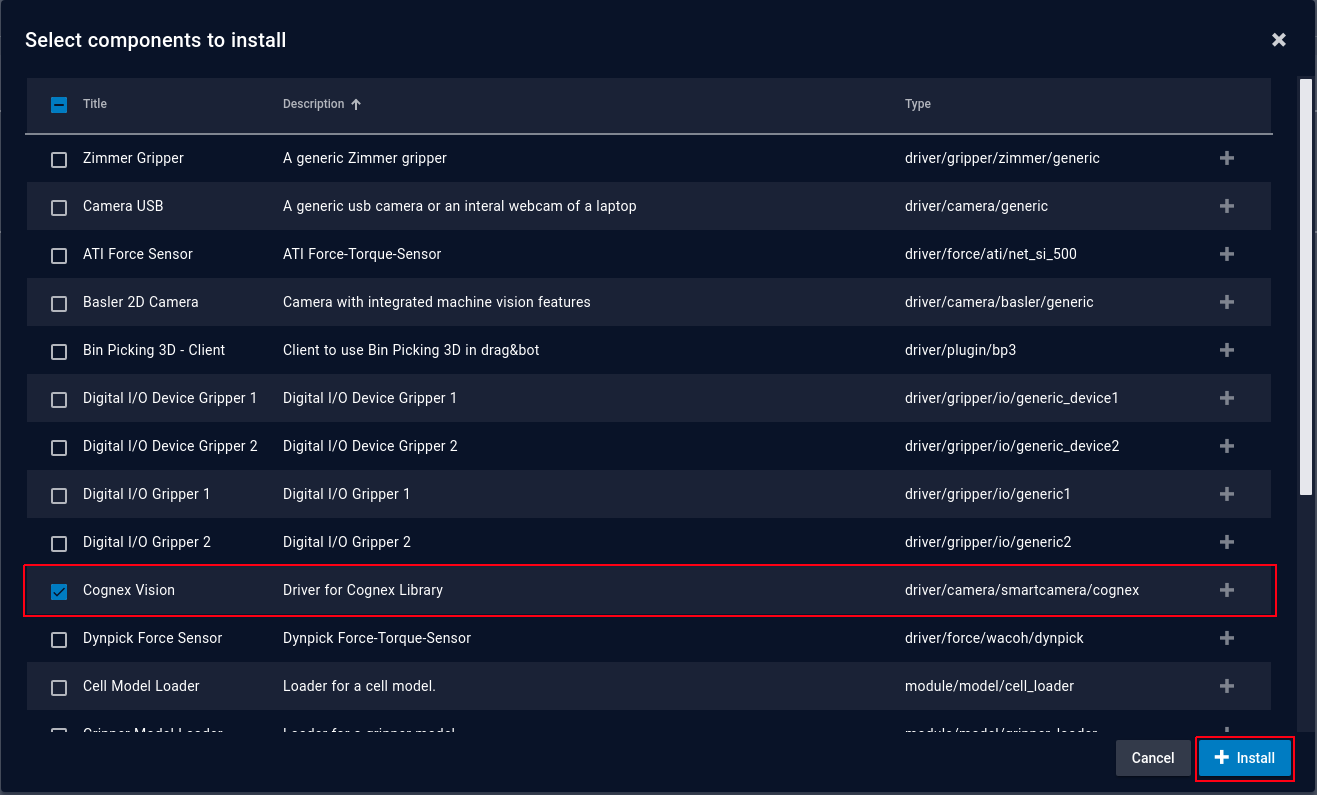
- Go to the Component-Manager and add the Cognex vision component.
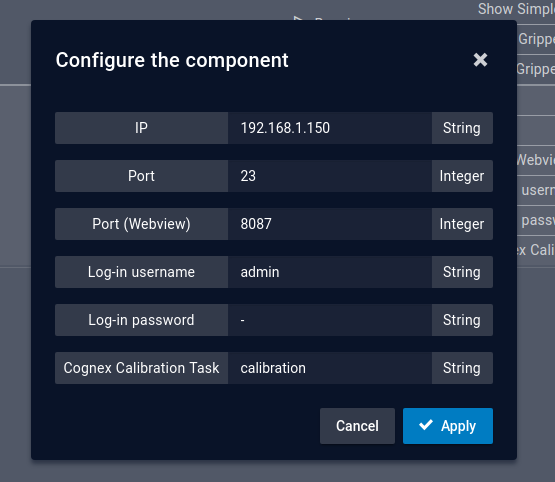
- Enter the camera IP and Telnet port into the dragandbot Component-Manager (The camera default port number is 23 unless its changed) Refer to Point 4 of section 1.1. Enter the camera administrator username and password, the default username is admin with no password (represent in drag&bot with the symbol "-"). Enter the camera extrinsic calibration task name to be used Refer to section 3.2.
3. Camera Calibration
3.1 Intrinsic Calibration
Please note that the Camera should be offline before doing the calibration..
3.2 Extrinsic Calibration
In case you would like to calibrate the camera extrinsically using drag&bot:
Important
- Please be advised that the program provided below is intended for reference purposes only. You are encouraged to create your own calibration program from the beginning.
- Please note that programs may not be compatible with the different Cognex smart cameras, firmware, or different insight explorer versions. Using the program below directly on your camera could result in an error message during drag&bot extrinsic calibration.
- Download the drag&bot reference Cognex calibration job from here: DOWNLOAD
 and import it to your Camera.
 - Create your own calibration program from the beginning based on the reference program in the previous step.
- Adjust the camera image acquisition settings (brightness, focus, ..etc). Adjust the searching tool in case it can't detect the fixtures on the calibration sheet .
Refer below video for more details.
- Follow the Smartcamera extrinsic calibration procedure. In the calibration wizard, you can enter the calibration file name that you want to save the date to it, use the same file name in the drag&bot Cognex function blocks later.
4. Function Blocks
4.1. Cognex - Select Job
| Field name | Data type | Description | |
|---|---|---|---|
| Inputs | Job Name | String | The camera job name to be triggered, normally without the .job ending |
| Outputs | - | - | - |
4.2. Cognex - Trigger Job
| Field name | Data type | Description | |
|---|---|---|---|
| Inputs | Program Type | - | 2D Program, 3D Program, Text/QR-Code |
| Robot Calibration | Boolean | Activate this option in case you used drag and bot for the camera extrinsic calibration | |
| Calibration name | The calibration name, in case of activated Robot Calibration | ||
| Outputs | Success | Boolean | The job execution success flag |
| No of detected Objects | int | The camera job execution success flag | |
| Position | POSE | The position of the first detected object in the result message | |
| Detected Text | String | The detected Test/QR-Code in case of text detection |
5. Troubleshooting
5.1. Execution Error
In case of an error during the function block execution, the function block can threw an error message. The table below show the most common error messages and possible cause/solution for it.
| Error Message | Meaning / Cause | Possible solution |
|---|---|---|
| CANNOT_EXECUTED_CAMERA_IS_OFFLINE | The command could not be executed or the sensor is Offline. | Ensure that the camera is set in online using the web interface or the In-Sight Explorer |
| LOGGED_IN_USER_ACCESS_DENIED | User does not have full access to execute the command. | Ensure the logged in user have permission to operate the camera. Ensure that the logged in username and password are correct. |
| NO_OBJECT_DETECTED / NO_TEXT_DETECTED | No object/text is detected or the tool execution is failed. | Check the camera image acquisition settings (brightness, focus, ...etc ) |
| CAMERA_RETURN_MESSAGE_IS_NOT_CORRECT | The Camera return message format is not correct | Ensure that the message format is as per the section 1.2 |
| COMMUNICATION_ERROR | Camera communication error | Check the network configuration, is the camera in pingable? Check the entered Camera IP, port, username, and password. |
| JOB_NAME_IS_NOT_CORRECT | The job file name can't be located in the camera | check the job file name. Is the job server is enabled? this can be checked in the In-sight explorer Sensor menu => Job Server Settings. When Job Server is enabled, then the camera tries to load the job from the specified job server (FTP server), not from the camera |
| CANNOT_SET_THE_CAMERA_INTO_OFFLINE_MODE | Can't put the camera into offline mode before changing the job | Is camera is controlled by another client ?(ex. : In-sight Explorer), Try to put the camera into online mode first using In-sight Explorer or the camera webInterface and disconnect the other clients. |
| CAMERA_IS_ONLINE_OR_JOB_NAME_IS_NOT_FOUND | The job can't be loaded as the camera is online or the job file name can't be located in the camera. | Ensure that no other client is controlling the camera. Check the job file name. Is the job server is enabled? this can be checked in the In-sight explorer Sensor menu => Job Server Settings. When Job Server is enabled, then the camera tries to load the job from the specified job server (FTP server), not from the camera |
| CAMERA_IS_OUT_OF_MEMORY | The camera memory is full | Try to free some memory in the camera by deleting old pictures/videos. |
| CAMERA_CANNOT_SET_TO_ONLINE_MODE | The camera was set manually into offline mode using the the In-Sight Explorer or the Web interface | Set the camera into online mode using the In-Sight Explorer or the Web interface |
| CALIBRATION_ERROR | Error in the extrinsic calibration or the calibration name is not correct/available | Check the calibration name. Is the camera extrinsically calibrated using drag and bot ? |
5.2. Maximum Message Length
In case of multi objects detection job, the result message may exceed the max allowed message length of 255 characters. In this case, you could refer to below video on how to reduce the message length by individually selecting the relevant message fields and adjusting their decimal precision accordingly.