Epson TP2 Teach Pendant guide
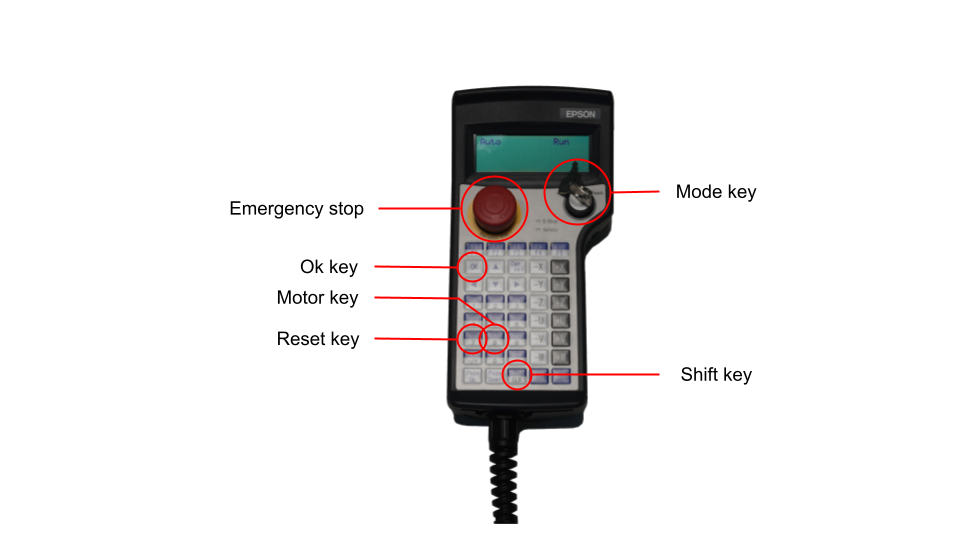
This section describes how the TP2 (RC90/RC180 Option) Teach Pendant can be used together with drag&bot. The most relevant keys of the Teach Pendant are marked in red in the following pictures.
As this guide covers only the most important functionalities, please check the official TP2 Operation Manual for further information.
Teach Mode
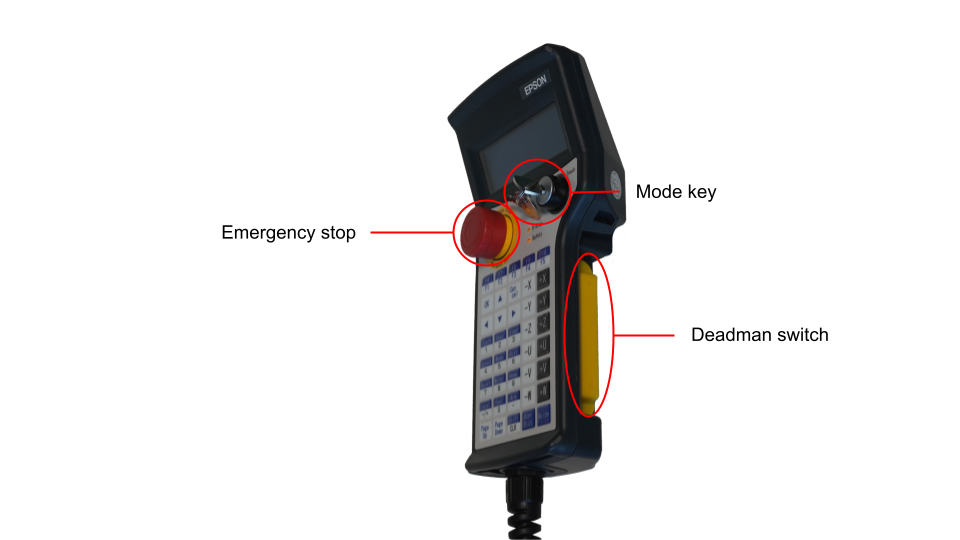
In this mode, the robot motion can only be performed by manually pressing the corresponding TP2 arrows together with the deadman switch. drag&bot will not be able to move the robot or power the motor in this mode, but is still able to read information from the robot controller such as the joints position, cartesian position or the robot state.
The current cartesian or joint position can be saved as trajectory waypoint through drag&bot Trajectory Wizard at any time.
Auto Mode
Warning
Humans inside the robot cell during automatic operation are strictly forbidden.
Warning
Changing to automatic mode will reset controller errors and turn on the motors.
In this mode robot motion can be performed automatically without requiring human interaction with the Teach Pendant. drag&bot can move the robot by executing programs or by using the Operator's Panel.
Changing between Teach and Auto modes
Turn the Teach Mode key to the right to change to Teach mode. Turn the key to the left to change to Auto mode.
Recover from emergency stop
In Auto Mode errors will be recovered and the robot will be powered on automatically. In Teach Mode you need to follow these steps to recover an error:
-
Release the emergency stop button (if pressed).
-
Change to Teach Mode by selecting the correct Teach Mode key position.
-
Press Reset key. Please note that by pressing Shift key the meaning of each key changes between white and blue.
-
Press Motor key and then confirm through pressing the Ok key.
Reset errors
As changing to Auto mode automatically resets any error, the easiest way to reset an error is changing the Teach Mode key to Teach mode and then back to Auto mode position. Another option is to follow the same steps as in Recover from emergency stop section.
It is also important to note that Cancel key is used to leave the current menu and go back to the previous one. Therefore, it is used to return to the main display if you are, by mistake or not, inside a configuration menu.
Display
The display shows the current teach and motion configuration. It is divided in five groups. For example: 001 LWS T00 A00 Off.
- Group 1: The current saving position index. This functionality is not relevant for drag&bot. It just shows the position number where the current position will be saved when clicking Teach in the teach pendant.
- Group 2: The motion information.
- Character speed: Low / High
- Character type: Joint, World, Tool, Local, ECP (external)
- Character distance: Continuous, Long step, Medium step, Short step, User defined
- Group 3: The current selected tool number. You may configure several tools in the teach pendant, therefore you can select the current active. This is an advance feature.
- Group 4: The current selected arm number. An advance feature for using the teach pendant with multiple robot arms.
- Group 5: Motor is On or Off. Therefore indicates if motion is possible or not.
Jogging the robot
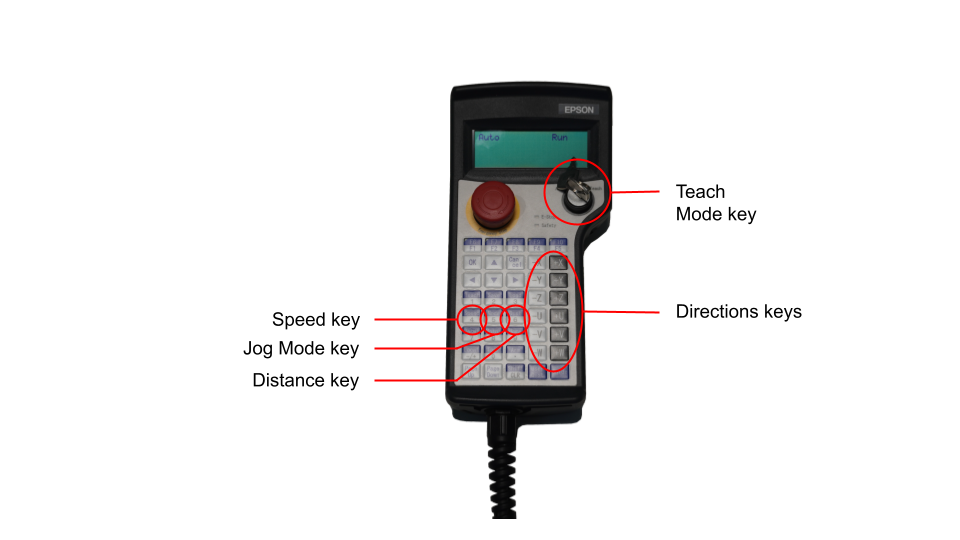
The Teach Pendant can be used together with drag&bot GUI for moving and teaching robot positions when turning the Mode key to Teach Mode. The following picture shows the most important related keys.
Changing speed
Use the Speed key to set low (L) or high (H) speed. The display will show the current selected speed as the first character of the second group. For example: 000 LJS T00 A00 Off
Alternate cartesian and joint motion
Use the Mode key to change between Joint and Cartesian motions. There are five types of motion:
- World: Cartesian motion, where the origin is the robot base coordinate system (world). It is indicated as W.
- Tool: Cartesian motion, where the origin is the current tool center point. It is indicated as T.
- Joint: Jog each joint of the robot. It is indicated as J.
- Additionally, there are different Local (L) defined cartesian coordinate system and ECP external defined cartesian coordinate systems. For more related information please check the user manual.
The type of the motion is indicated as the second character in the second group in display. For example: 000 LWS T00 A00 Off
Change jog distance
The jog motion type can be Step or Continuous. The Dist key can be pressed to change between modes and step distance. The current type is indicated as the third character in the second display group. E.g. 000 LWM T00 A00 Off
There are five possibilities:
- Continuous (C): moves the robot as long as the deadman switch / enable button and the corresponding direction is pressed.
- Step: moves the robot only the maximum distance on each direction key click. The deadman switch also needs to be kept pressed.
- Step Long (L): 10 mm maximum distance.
- Step Medium (M): 1 mm maximum distance.
- Short (S): 0.1 mm maximum distance.
- User (U): User defined. Please check the user manual for more information.
Jog the robot
In cartesian jog mode, use the corresponding (-X, +X, -Y, +Y, -Z, +Z) keys for axis translations and (-U, +U, -V, +V, -W, +W) for rotations while pressing the deadman switch (also known as enable button) behind the teach pendant at the same time. In joint jog mode, X corresponds to the first joint, Y to the second, Z to the third, U to the fourth, V to the fifth and U to the sixth.