Ethernet software network setup
Summary
This page describes how to configure the network connections in your IPC. Hardware configuration is assumed to be already finished.
- General network setup of the IPC
- A list of links to robot specific hardware configuration
Configure the connection to the robot
Typically the robot and the IPC are connected using static IP addresses. This means that each device has a fixed address which is shared inside a range. Dynamic IP addresses are managed by a DHCP server (typically a router) on the network.
Tip
To identify your the name (id) of each ethernet adapter we recommend to connect just only one cable and then run nmcli device status command in the Linux terminal. This command will display which ones are connected.
Create a new network connection
If you previously didn't create or have an existing connection then you need to create a new one.
- Open the on the top menu panel.

-
Open .
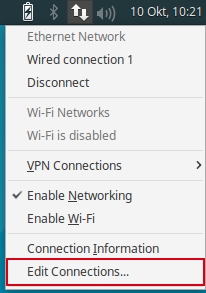
-
Click on → Type: Ethernet → . The following videos shows how to create a new connection and configure it.
- Give as connection name something understandable such as the name of the robot and continue with the static IP setup.
- Select the corresponding ethernet device. Usually they will start with e for Ethernet and w for wifi.
- Configure IP, netmask and gateway following next section.
Setup a static IP on the IPC
The following video shows how to select and configure an existing connection.
 Click on the network icon of the top menu bar.
- Click Edit Connection. The network view will be shown.
- Click on an existing connection e.g. Ethernet connection 1 or Robot.
- Click the Edit button.
- Set a name for the connection like Robot
- Click the IPv4 Settings Tab and setup the IP of the current computer.
-
Write a IP in the same range as the future robot connected, e.g. IP: 192.168.0.100 and Netmask: 24. Leave gateway empty.
Note
255.255.255.0 is equivalent to writing 24. Also 255.255.0.0 and 16 are valid ranges because they are less restrictive. Depending on the robot configured you may need to change those IP and netmask values in the future.
Tip
You can configure more than one static IP address with only one physical adapter. This is useful if you want to connect to devices with completely different addresses, such as 10.17.1.1 and 192.168.0.74. In this case, as example you can create a 10.17.1.2 and 192.168.1.100 with corresponding netmasks 255.255.255.0 and 255.255.0.0.
Configure Internet connection
Typically Internet is connected through dynamic IP address (DHCP). Therefore no IP, mask and gateway is necessary because this will be automatically configured.
Proxy Setup (optional)
Some networks will only allow connection to the outside when proxy settings are set for linux. Please contact your IT department to check if this is necessary and in affirmative case, then follow the instructions.
Configure the environment
- Open a terminal.
- Enter:
sudo mousepad /etc/environment - In a new line, enter the following snippet:
http_proxy="http://proxyserver.com:8080/" https_proxy="http://proxyserver.com:8080/" ftp_proxy="http://proxyserver.com:8080/" no_proxy="localhost,127.0.0.1,localaddress,.localdomain.com" HTTP_PROXY="http://proxyserver.com:8080/" HTTPS_PROXY="http://proxyserver.com:8080/" FTP_PROXY="http://proxyserver.com:8080/" NO_PROXY="localhost,127.0.0.1,localaddress,.localdomain.com" - Replace the URL
http://proxyserver.com:8080/with the URL of the required proxy server. - If you need to use credentials build the URL like this:
- URL:
http://<username>:<password>@proxyserver.com:8080/ <username>should be replaced with the used username<password>should be replaced with the correct password
- URL:
- Now save the file.
Configure package manager
- Open a terminal.
- Enter:
sudo mousepad /etc/apt/apt.conf.d/95proxies - Add the following snippet:
Acquire::http::proxy "http://proxyserver.com:8080/"; Acquire::ftp::proxy "ftp://proxyserver.com:8080/"; Acquire::https::proxy "https://proxyserver.com:8080/"; - Replace the URL
http://proxyserver.com:8080/with the URL of the required proxy server. - If you need to use credentials build the URL like this:
- URL:
http://<username>:<password>@proxyserver.com:8080/ <username>should be replaced with the used username<password>should be replaced with the correct password
- URL:
- Now save the file.
- Reboot your system.